Key takeaways
- Ergonomic training plus an adjustable chair reduced upper body pain by 46% after 12 months (Amick et al., 2012).
- A workstation intervention cut musculoskeletal symptoms by 40% and boosted productivity by 12% over 15 months (Robertson et al., 2009).
- Workers who followed a desk ergonomics checklist twice daily saw a 61% drop in neck pain and 55% drop in shoulder pain after six months (Shariat et al., 2018).
- Most desk fixes cost nothing – a rolled towel for lumbar support and stacked books for monitor height solve the two most common problems.
- Use the 12-point checklist in this guide to audit your setup in under 10 minutes.
What you will learn in this guide
- Why desk ergonomics matter more than your chair
- Step 1: Set your chair height
- Step 2: Set your desk height
- Step 3: Position your monitor (single and dual)
- Step 4: Place your keyboard and mouse
- Step 5: Laptop-specific ergonomics
- Step 6: Lighting and glare prevention
- Step 7: Common mistakes to fix now
- The 12-point desk ergonomics checklist
- Budget-friendly fixes
- Frequently asked questions
The average office worker sits at a desk for more than eight hours a day. Over a career, that adds up to roughly 80,000 hours. When your desk is set up badly, those hours turn into neck pain, back tension, wrist strain, and headaches.
Here is the good news: most of those problems are fixable in a single afternoon.
This guide walks you through every part of a proper desk setup, step by step. Whether you work in an office, a home workspace, or at a kitchen table, the principles are the same – and most fixes cost nothing.
Why desk ergonomics matter more than your chair
Your desk setup determines your posture for the entire workday. Even the best ergonomic chair cannot compensate for a monitor that is too low, a keyboard that is too high, or lighting that forces you to lean forward.
Most people focus on buying a better chair when their back hurts. That helps, but it is only one piece. Research by Amick et al. (2012) found that ergonomic training combined with an adjustable chair reduced upper body pain by 46% – the training and setup mattered as much as the furniture itself.
The steps in this guide follow a specific order because each one builds on the last. Start with your chair height, then work outward to your desk, monitor, keyboard, and lighting. Changing them in the wrong order means you will have to redo earlier steps.
Step 1: Set your chair height
Your chair is the foundation. Everything else – desk height, monitor position, keyboard placement – flows from how you are seated. Get this wrong and every other adjustment will be off.
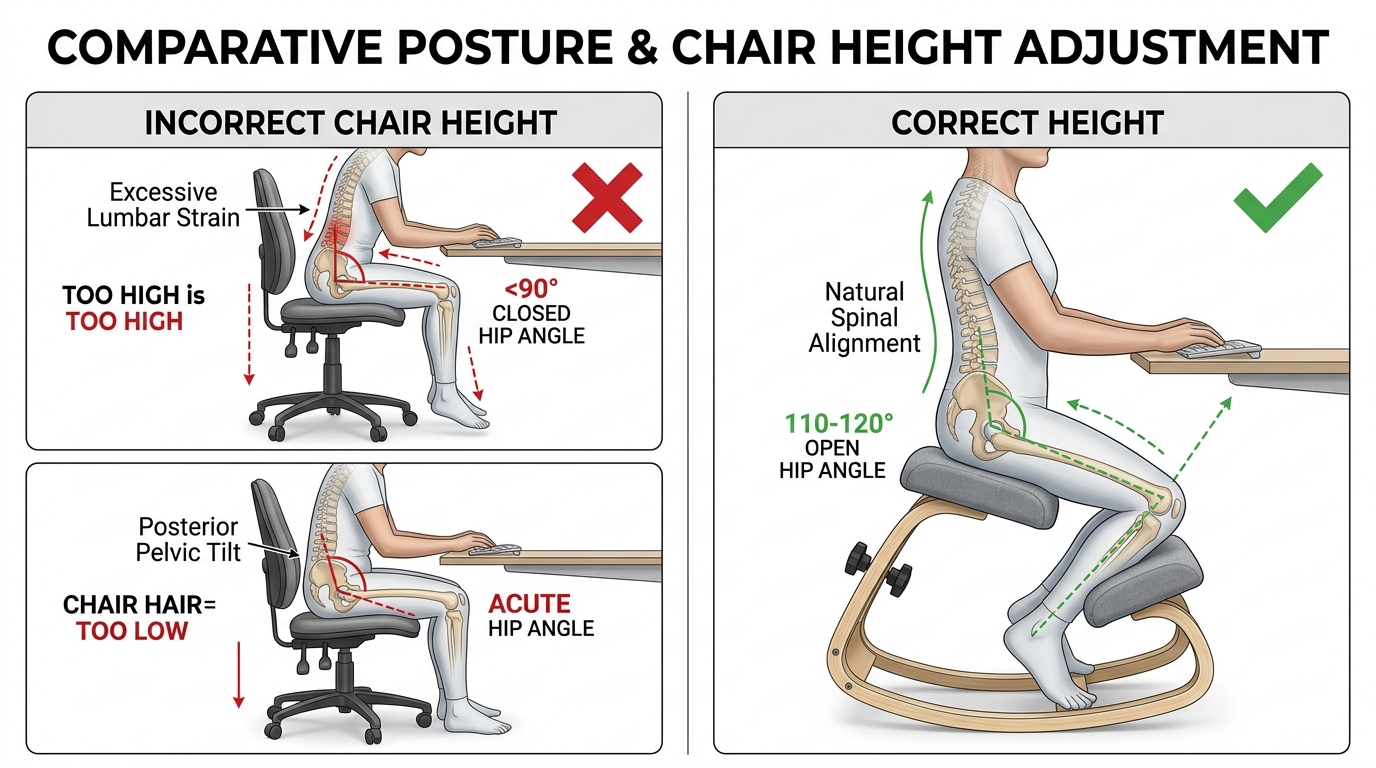
To find the right height, stand next to your chair and set the seat just below your kneecap. Sit down. Your feet should rest flat on the floor without pressure on the underside of your thighs. Knees should be at about 90 degrees or slightly more open.
If your chair is too high, blood flow to your lower legs slows and pressure builds under your thighs. If it is too low, your hip angle closes and your lower back loses its natural curve. Both cause pain within hours.
Chair height adjustment is step one, but not all chairs adjust equally. If your current chair cannot reach the height described here, it may be time for an upgrade. Our Chair Finder Quiz helps you find one that fits your desk setup.
Chair height quick check
- Feet: Flat on the floor (or on a footrest if your desk forces a higher chair)
- Thighs: Roughly parallel to the ground
- Knees: At 90 degrees or slightly more open
- Seat depth: Two to three finger-widths between seat edge and back of knees
- Pelvis: Neutral tilt – not tucked under, not arched forward
If your desk forces you to raise your chair too high, add a footrest so your feet do not dangle. A small step stool or sturdy box works fine. If your chair lacks a seat depth adjustment, place a small pillow behind your lower back to bring you forward on the seat.
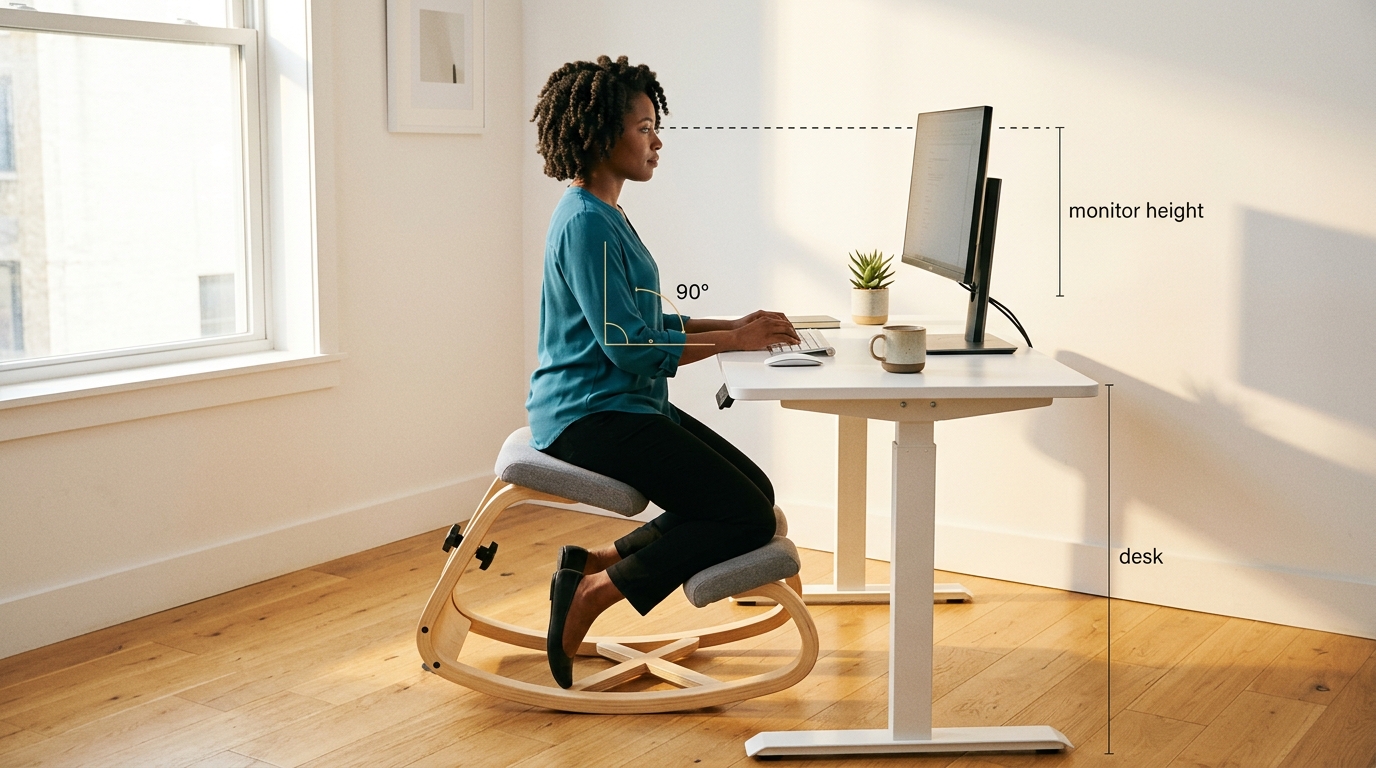
Step 2: Set your desk height
With your chair at the right height, your desk should let your forearms rest at about 90 degrees at the elbow. Your wrists should be flat – not bent up or down. This neutral wrist position prevents the compression that leads to carpal tunnel symptoms.
Most desks are 28 to 30 inches tall, which works for people about 5 feet 8 inches to 6 feet 0 inches. If you are shorter or taller, a height-adjustable desk or keyboard tray bridges the gap. Without one, shorter people end up reaching up (causing shoulder tension) and taller people hunch down (causing back pain).
If you use a sit-stand desk, the same rule applies when standing: elbows at 90 degrees, wrists flat, screen at eye level. Switch between sitting and standing every 30 to 60 minutes. Standing for hours straight creates its own set of problems – for more on this, see our guide on how to fix your posture.
Step 3: Position your monitor
Your monitor controls where your head and neck sit all day. Getting this wrong is the single fastest path to headaches, neck pain, and eye strain. A screen positioned even two inches too low forces your head forward, adding up to 27 pounds of extra load on your cervical spine (Hansraj, 2014).
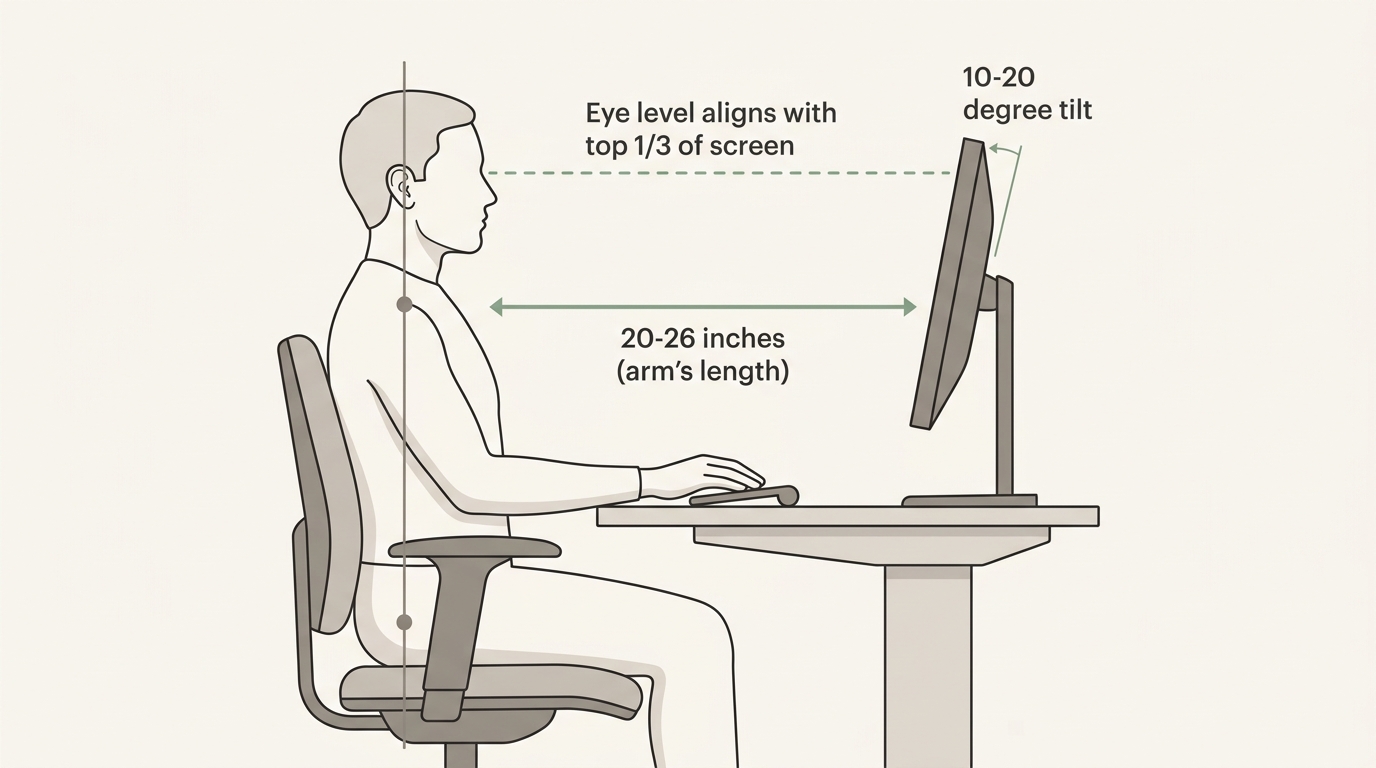
Place the top of the screen at or just below eye level. Set it about an arm’s length away – roughly 20 to 26 inches. The screen should be directly in front of you, not off to one side. If you lean forward to read text, increase the font size or zoom level rather than pulling the screen closer.
Dual monitor setup
If you use two monitors equally, center yourself between them so neither screen requires you to turn your head more than 35 degrees. If one is your primary screen, place it directly in front of you and the secondary off to the side at the same height.
Match the height of both monitors. Even a one-inch difference causes you to tilt your head repeatedly throughout the day. Over weeks, that small tilt creates one-sided neck pain and tension headaches that seem to appear from nowhere.
The font size test
If you catch yourself leaning forward to read anything on screen, do not move the monitor closer. Instead, increase your system font size or browser zoom to 125%. Moving the screen closer shifts everything else out of alignment and undoes the work you did in steps 1 and 2.
Step 4: Place your keyboard and mouse
Your keyboard should sit at a height where your elbows are at roughly 90 degrees and your wrists are straight. Many people flip out the keyboard’s rear feet, but this actually bends your wrists upward – the opposite of what you want. Keep those feet folded in unless you have a negative-tilt tray.
Place your mouse at the same height as the keyboard and as close to it as possible. Reaching for a mouse placed too far to the right is one of the top causes of right-shoulder pain in office workers. If you use a mouse heavily, try a vertical mouse that keeps your forearm in a natural handshake position.
Step 5: Laptop-specific ergonomics
Laptops force a fundamental trade-off – either the screen is at the right height and the keyboard is too high, or the keyboard is at the right height and the screen is too low. There is no position where both work correctly at the same time.

The fix is simple: plug in an external keyboard and mouse (starting at about $15 total), then raise the laptop on a stand, shoebox, or stack of books until the top of the screen hits eye level. This one change eliminates the neck-down posture that causes most laptop-related pain.
If you travel with your laptop, even a small portable stand makes a meaningful difference. The key rule: never use a laptop flat on a surface for more than an hour without either raising it or taking a movement break.
Step 6: Lighting and glare prevention
Bad lighting does not just cause eye strain – it triggers the small posture shifts (leaning forward, tilting your head, squinting) that lead to neck and back pain over time. Most people ignore lighting entirely when setting up a desk.
- Position your desk so windows are to the side, not behind or in front of your screen. Sunlight hitting a monitor creates glare. A bright window behind your screen forces constant eye adjustment.
- Use a desk lamp with adjustable brightness for task lighting. Overhead fluorescents alone create shadows and uneven illumination.
- Match screen brightness to room brightness. Dim room? Turn the screen down. Bright room? Turn it up. A large difference between screen and room brightness causes eye fatigue within an hour.
The 20-20-20 rule is not optional
Every 20 minutes, look at something 20 feet away for 20 seconds. This relaxes your focusing muscles and cuts screen-related eye strain significantly. Skipping this leads to the forward lean and squinting that wrecks your neck posture by mid-afternoon.
Step 7: Common mistakes to fix now
Even good setups often include these errors. Each one seems minor on its own, but over eight hours a day they compound into real pain. Check yours against this list.
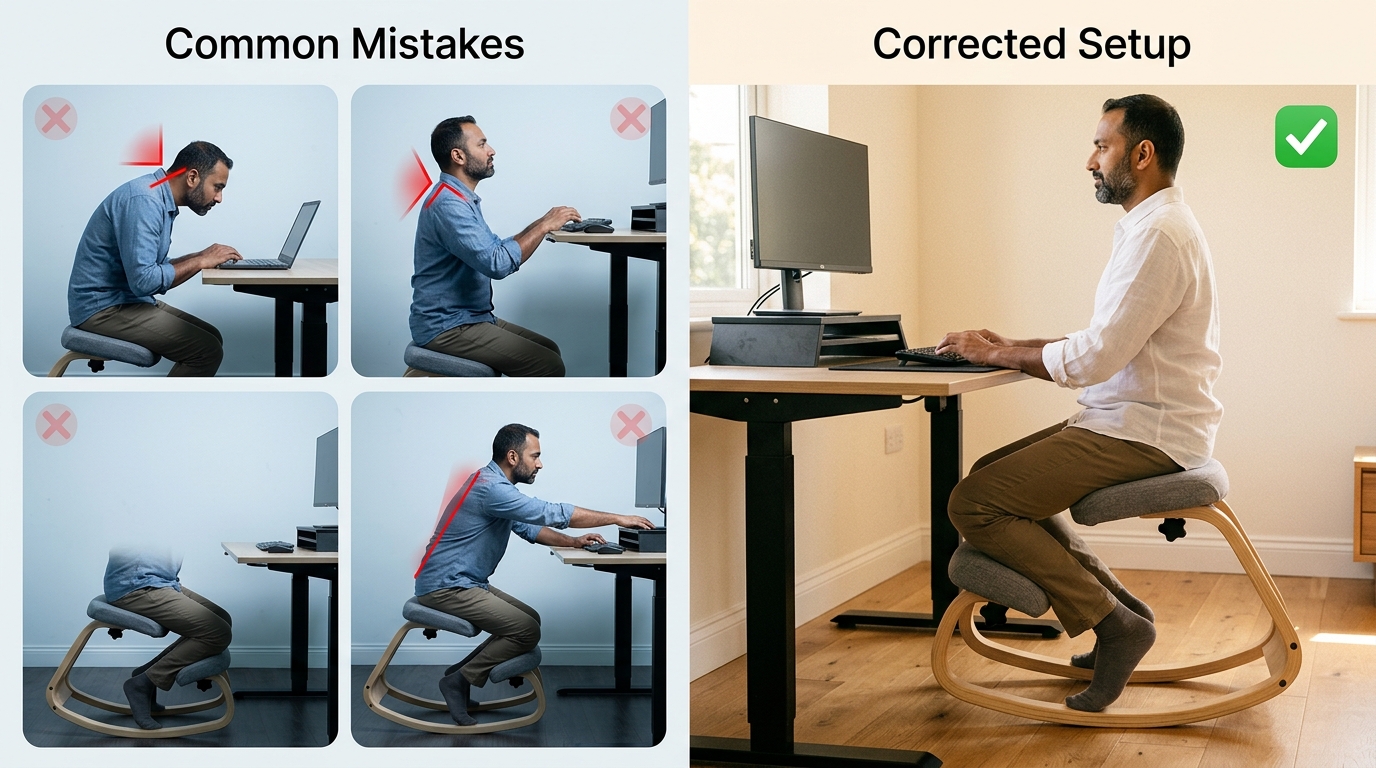
- Phone cradling: Holding a phone between your ear and shoulder creates severe neck strain. Use a headset or speaker for any call longer than a minute.
- Crossing your legs: This tilts your pelvis, throws off your spine, and slows blood flow. Keep both feet on the floor or on a footrest.
- Keyboard feet flipped up: Those rear feet bend your wrists upward. Keep them folded flat for a neutral wrist angle.
- Armrests too high or too low: If your armrests push your shoulders up, lower them or remove them. If they are too low, your arms hang and pull your shoulders down.
- Sitting still for hours: The best desk setup in the world cannot make up for eight hours without movement. Movement breaks every 30 to 45 minutes are the most important part of workstation health.
For posture habits that complement your desk setup, read our complete guide to fixing your posture. If you are still dealing with neck pain from desk work after making these changes, the problem may run deeper than your desk layout.
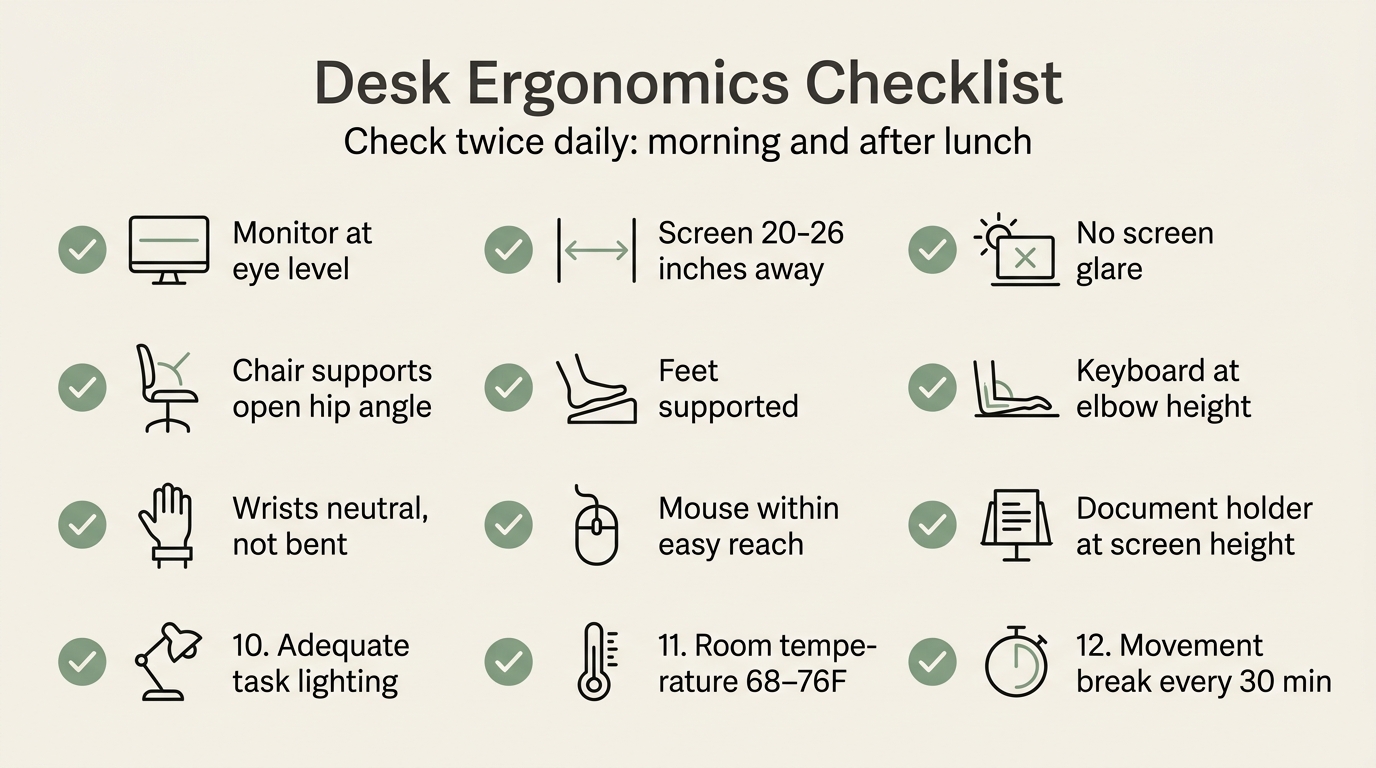
The 12-point desk ergonomics checklist
Use this list to audit your setup right now. If you can say yes to each item, your desk is in good shape. Run it twice a day – once in the morning and once after lunch – because setups drift as the day goes on.
- Feet flat on the floor or on a footrest.
- Thighs roughly level with the ground, knees at 90 degrees or a bit more.
- Two to three finger-widths of space between seat edge and the back of your knees.
- Lower back supported by the chair’s lumbar support or a small cushion.
- Shoulders relaxed – not raised or hunched forward.
- Elbows at about 90 degrees and close to your body.
- Wrists straight and flat when typing – not bent up or down.
- Top of monitor at or just below eye level.
- Monitor about an arm’s length away and directly in front of you.
- No glare on the screen from windows or overhead lights.
- Mouse at keyboard height and within easy reach.
- Movement break at least every 30 to 45 minutes.
Why this checklist works
Shariat et al. (2018) found that office workers who followed a desk ergonomics checklist twice daily saw a 61% drop in neck pain and a 55% drop in shoulder pain after six months. The checklist itself – not expensive equipment – drove the improvement.
Budget-friendly fixes
You do not need expensive equipment to build a healthy workspace. Here are low-cost solutions for the most common problems – most cost nothing at all.
- Monitor too low: Stack it on a sturdy box, a ream of paper, or thick books. Free, and just as effective as a $50 stand.
- No lumbar support: Roll up a bath towel and place it behind your lower back. Use a rubber band so it does not unroll.
- Laptop posture problems: Use any external keyboard (starting at $15) and raise the laptop on a stand, shoebox, or stack of books.
- Desk too high: If you cannot lower the desk, raise your chair and add a footrest. A small step stool keeps your feet flat.
- No adjustable chair: Add a seat cushion to raise yourself. Use the towel trick for lumbar support. Place a pillow on the seat if it is too deep.
Once the free fixes are in place, the highest-impact upgrade is usually your chair. If you are still using a dining chair or a basic office chair without proper adjustment, here is how to choose an ergonomic chair that actually matters. You can also run your own ergonomic self-assessment to identify which changes will make the biggest difference.
The one upgrade that fixes steps 1 through 3 at once
The NYPOT Kneeling Chair’s forward-tilt design automatically sets your pelvis, spine, and head alignment – eliminating the need to micromanage chair height, back angle, and monitor position separately. One piece of furniture, three ergonomic fixes.
Frequently asked questions
How long does it take to feel the difference after fixing my desk setup?
Most people notice less pain within the first week. Robertson et al. (2009) found measurable symptom reduction within months, but many changes – especially chair height and monitor position – produce relief within days.
Do I need to buy an expensive ergonomic chair?
Not necessarily. The budget fixes in this guide can make even a basic dining chair much better. A good ergonomic chair helps, but it is not the only path. If you are ready to invest, read our guide on choosing an ergonomic chair.
What if my employer will not pay for ergonomic equipment?
Start with the free fixes first. Books for monitor height, a towel for lumbar support, and a timer for movement breaks cost nothing. Document any ongoing pain and bring it to HR with the research from this guide. Many employers cover ergonomic equipment once they see the productivity data – Amick et al. found a 46% reduction in pain-related complaints.
Bottom line on desk ergonomics
The pattern across every study is the same: small setup changes create big, measurable improvements. You do not need a complete office overhaul. You need the right adjustments applied consistently. Start with the 12-point checklist, fix what fails, and revisit it weekly until every item passes.
Your next steps
The best desk setup is the one you actually adjust. A perfect layout on paper means nothing if your chair stays at the wrong height and your screen never moves.

Start with the 12-point checklist above. Which items does your current setup fail? Fix those first. If your back and neck are still hurting after optimizing your desk, our article on the science of sitting pain explains what might be going on at a deeper level.
Your desk setup is only as good as your chair
You have optimized your monitor, keyboard, and lighting. But if your chair cannot maintain the angles this guide prescribes, every other fix is temporary. Let our Chair Finder Quiz complete the picture.
References
- Amick, B. C., et al. (2012). “Effect of office ergonomics intervention on reducing musculoskeletal symptoms.” Spine, 37(18), 1559-1568.
- Hansraj, K. (2014). “Assessment of stresses in the cervical spine caused by posture and position of the head.” Surgical Technology International, 25, 277-279.
- Robertson, M. M., et al. (2009). “The effects of an office ergonomics training and chair intervention on worker knowledge, behavior and musculoskeletal risk.” Applied Ergonomics, 40(1), 124-135.
- Shariat, A., et al. (2018). “Effects of stretching exercise training and ergonomic modifications on musculoskeletal discomforts of office workers.” Human Factors, 60(7), 1086-1107.
This article contains affiliate links. ErgoLife Foundation may earn a commission at no additional cost to you. All recommendations are based on our independent research and mission to improve workplace wellness.